Names – Move Prefix to empty Suffix #names

This little query responds to the desire expressed by RootsMagic Forums member Ksquared to relocate Titles of Nobility from Prefix to Suffix. This is where they ended up in the direct import of his TMG project to RootsMagic. It moves the prefix for each name to the suffix field, provided it is empty. If the suffix field is non-empty, the prefix is left in situ.

The query require a SQLite manager having the RMNOCASE collation, such as SQLiteSpy or SQLite Expert Personal. See SQLite Managers for download links.

Having opened the RootsMagic database with the SQLite manager, copy the statement below into the SQL editor and execute it.

After executing, use the RootsMagic menu File > Database Tools to check database integrity, if not OK then Rebuild Indexes and repeat.

UPDATE NameTable
SET Suffix = Prefix
    , Prefix = ''
WHERE
Prefix NOT LIKE ''  -- only those records with both non-empty Prefix
AND NameID          -- AND empty suffix
NOT IN
(
  SELECT NameID     -- records having a non-empty suffix
  FROM NameTable
  WHERE
  Suffix NOT LIKE ''
)
;

Names – Edit NameTable with SQLite Expert #names #alternatenames #editable #sqliteexpert

A question by MaryLou1955 about swapping a Name with an Alternate Name prompted this look at an easy way to do it, especially for someone new to SQLite. This page starts by showing how one can answer MaryLou’s question by directly editing the RootsMagic database with a SQLite manager without needing to know anything about writing SQL statements. Then it introduces a simple SQLite script that can expedite future edits of the NameTable and introduce you to some very basic SQLite commands and expressions.

While I tend to use SQLiteSpy for most things, I find myself turning to SQLite Expert Personal more frequently than before and this is one of them. While its user interface is a bit more daunting to start with, it has features that ultimately make it more suited to this task – editing a subset of columns from a table. If you do not have it already, visit the page SQLite Managers and follow the links to download SQLite Expert Personal and the associated fake RMNOCASE extension.

Editing RootsMagic Database with no knowledge of SQL

  1. Start SQLite Expert
  2. File > Open Database
  3. Browse to the folder holding the copy of your RootsMagic database (file extension .rmgc and, of course, you made a backup or this is a copy you have renamed)
  4. Start typing the name of the RM database file in the File name field – a list should drop down. Select the one you want and click Open.
  5. Right-click on the name of the database that has now appeared in the sidebar and from the drop-down menu select Load Extension. Browse to where you stored unifuzz.dll and select it. OK the default entry point in the pop out window
  6. Click on the table name “NameTable” listed in the sidebar under the database name and then on the Data tab. The result should be similar to this: SQLiteExpertNameTable.PNG
  7. You can start editing right now but there are some features you should explore to make it easier and safer:
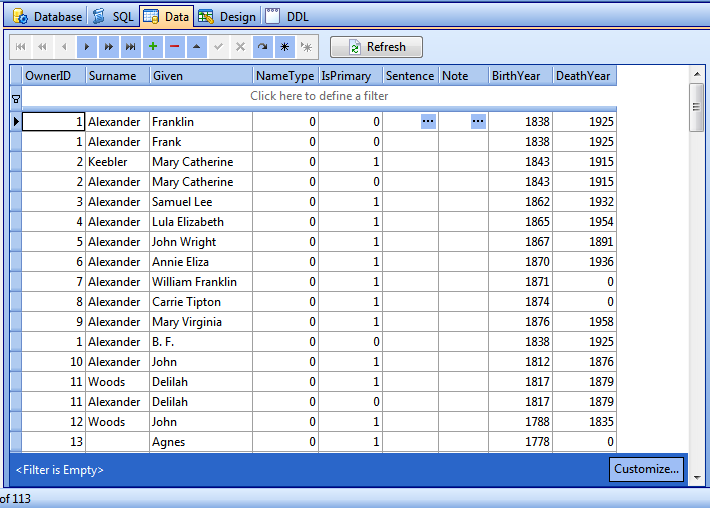
    1. There are a lot of columns so let’s reduce to the ones we are interested in. Right-click anywhere in the table display and select from the drop-down menu “Select columns”. Uncheck all those that are of no interest and use to your purpose. RecNo is simply the row number of the current result set and has nothing to do with RootsMagic’s Record Number. NameID is not to be touched and is invisible to you in RootsMagic. OwnerID is RootsMagic’s Record Number so check it but do not edit it! After selecting columns, you now have a more compact table to work with as in this screen:SQLiteExpertNameTableSelectColumns.PNG
    2. There’s more: Click on the heading of any column (not on the little funnel icon that will show when the pointer hovers over the header) to sort alternately between ascending and descending on the values in that column.
    3. And really powerful is that little funnel, the filter row below the headings and the filter row at the bot with the Cusize button. These are three complementary controls for filtering the results of any table or query to those of interest. For a simple example, I want to swap the primary Name and an Alternate Name for the person with RootsMagic RIN of 53. I simply type “53” into the filter row under OwnerID and get this:SQLiteExpertNameTableSelectColumnsFilter.PNGNow we see all of the names for Mary Haws-53 altogether and only her names. The NameType numbers represent Birth (2), Married (5) and Nickname (6). The IsPrimary number {1,0} is a True/False indicator. 0 or False means the name is an Alternate Name; 1 or True is the Primary Name. Only one of a person’s names should be marked 1 or Primary; any more disappear from RM screens. Much more complex filtering can be done without knowing any SQLite.
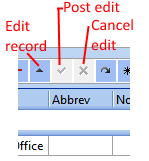
    4. Let’s change the Primary Name from Mary Haws to Polly Haws. There are shortcuts but here is a procedure that works with all types of fields. Right-click on the Mary Haws IsPrimary cell to open the Text Editor on that field. Replace the “1” with “0” and OK. Note the ungraying of the little button with a checkmark in it situated above the results pane. SQLiteExpertEditingControls.PNGThe change you made has yet to be applied to the database file. Clicking on that “Post edit” button completes the edit as does simply selecting a cell in another row. Now we have no Primary Name and RootsMagic has a Person with only Alternate Names. So now we edit Polly Haws’ IsPrimary field from 0 to 1, Post Edit and, voila, RootsMagic now has Polly Haws as the primary name.
    5. As with most Windows programs, there is more than one way to do editing. All the fields of one record can be accessed from an edit screen via the edit record control or by double-clicking on a cell. Experiment with a Play database to get to know the controls and become comfortable with the procedures.
  8. After editing, when you return to RootsMagic, run its Database Tools: Integrity Check, if not OK then: Rebuild Indexes, repeat.

A SQLite script to setup the screen

If you have not written or run a SQLite script before, here is a simple one that will execute the reorganization of the table display into a more compact form sorted by OwnerID (RIN). Names-Edit_NameTable.sql

  1. Download it to a place where you can readily find it.
  2. Click on the SQL tab. Below it, there will appear one or more SQL panes with tabs named SQL1, SQL2, … If this is your first time, there will be one empty pane.
  3. Either via the Main Menu > SQL or by right-clicking in the SQL pane, select “Load SQL script”, browse to and select the .sql file just downloaded. The SQL pane will now show the contents of the script.
  4. To execute the script, be sure that you have the desired database selected in the sidebar, then click the “Execute SQL” button. You will see results similar to this:Names-Edit_NameTableSQLiteExpert.PNG
  5. You can reorganize the results using the same tools as for the Data display and edit the same way. Had the query involved any other table or contained anything other than the raw data from one table, it would be uneditable.
  6. You will note that the order of columns is different from the Data display which, by default, shows the order in the NameTable’s definition. That is a consequence of the order set in the SQLite SELECT statement, which you can change by editing the script and re-executing. You can also change the order in either SQL results or Data displays by dragging the column headers left or right. You can add or delete columns in the script, save it and reuse later.

Where to from here?

I hope this proves to be an easy enough entry into a wider understanding of the RootsMagic database and how it can be viewed and manipulated using a free, but good, SQLite manager. For a powerful search tool and to gain some insight into the roles of the various tables that make up a RootsMagic database, look at Search – wayfinding from data tables to RootsMagic screens.

Future of SQLite Tools for RootsMagic wiki #admin

Wikispaces terminated free subscriptions for non-education wikis on Oct 15, 2014. SQliteToolsforRootsMagic would have ended 30 days later unless we started paying Wikispaces $5/30days or $50/yr or migrate it to some other free hosting service. I could not imagine the work involved in transferring, unable to find any equivalent, free host. I asked if you were willing to contribute to keep it going here – 10 people x $5/person = one year. Several members responded generously to the call and a subscription has been purchased through to Nov 12, 2016 – details in the spreadsheet below.

Thank you, donors!

Tom


Action
On Oct 14, 2014, a PayPal donation button was added to the site and subscription taken for US$5 payments every 30 days via PayPal starting Nov 13, at the end of the free trial period. A spreadsheet to track donations and expenses was also added. On Oct 23, 2014 the Balance exceeded $50 and a one-year subscription was purchased. We can pre-purchase additional 12 month blocks if the balance permits or else revert to recurring payments until it does.With a balance of almost $50 on Oct 24, it seemed timely to close off the fundraising, and purchase another year. That’s done and fundraising for the next subscription period will reopen in October 2016.


What do we get for $5/mo in addition to continuing the wiki?

  • Storage capacity of 2GB instead of 0.5 GB. We currently use 0.1GB so we are still far from the Free limit.

What do you think we should do?

I am not an expert on this type of thing so have no idea as to whether free, easy to migrate to, alternatives exist. I am happy to be one of the “10” to help keep this site running; it is very useful.. MVS.

Database – Copy Master Lists to Shell

A feature oft-requested that, as of version 6.3.3.2, RootsMagic still does not offer while other software does is the ability to create a new database with custom elements from an existing database. This script works around that shortcoming by copying what might be called “Master Lists” from a developed database to a shell database newly created by RootsMagic. It supersedes an earlier script developed for RootsMagic 4 and 5 Depopulate but keep Customs, Places, Sources, published in Dec 2011. (RootsMagic 7 added the feature File>Import Lists from another database which addresses most of what this procedure does. 2019-01-27 TH)

This new script is also a complementary process to the old one. The new one starts with a new database and copies records from the developed database. The old script took a copy of a developed database and deleted people et al from it.

The script copies from a developed RootsMagic database to a new empty database of the same version:

  • customized standard fact types
  • custom fact types
  • master sources
  • media items tagged to sources and places
  • addresses for repositories and contacts
  • custom source templates
  • user defined places
  • webtags for sources and places
  • user settings for File Options rev 2014-10-14

Requirements:
SQLite Expert Personal with unifuzz.dll extension loaded OR equivalent SQLite manager that supports runtime variables and fake RMNOCASE collation. See RMNOCASE – faking in in SQLite Expert, …
Usage:

  1. Create a new empty database using RootsMagic; note the full path; close the database. rev 2014-10-14
  2. Open the developed database in the SQLite manager (it will be known as “main” in the script);
  3. Right-click on the name of the database in the sidebar and select Load extension; load unifuzz.dll;
  4. Load and execute the SQL script in a SQL tab;
  5. Enter the full path to and name of the shell database at the prompt;
  6. On finishing the script, open the shell database with RootsMagic; run Database Tools > Rebuild Indexes. rev 2014-10-14
  7. Close and reopen the database with RM to reset the start person and last person config settings. rev 2014-10-14

Database-CopyMasterListsToShell.sql

Depopulate but keep Customs, Places, Sources #database #places #placedetails #sourcetemplates #sources #facttypes #custom #media #roles

This script deprecated in favour of Database – Copy Master Lists to Shell (2014-10-13).

Makes an empty Master from current database, preserving custom fact types and source templates, Places, Master Sources and associated Repositories and Addresses, and Place/Source Media. Written for RM4 with instructions to edit for RM5.
CustomDatabaseShell.sql
There are two ways to do this:

  1. Use SQLite Developer with a fake RMNOCASE collation and execute the query directly on a .rmgc database. This should pose no risk as it adds nothing to the database. Moreover, RM5 is especially assured because it has the REINDEX Database Tool which will rebuild the indexes against the internal collation.
  2. Use other SQLite managers with the queries on Convert Database to NOCASE to create a NOCASE clone of the database. Then run CustomDatabaseShell query to depopulate the database. This NOCASE clone is usable in RM and probably will not throw up any sorting or indexing issue with the English alphabet, any more so than would the original; however, other language alphabets may be problematic. It would be advisable to add a dummy person, assign every fact, source and place to him, and drag and drop to a new database to restore the structure to RMNOCASE.
-- CustomDatabaseShell.sql
-- 2011-12-09 ve3meo
 
/*
 DELETES all records from a DB3_NOCASE copy of a RM4/5 database
 (OR, with SQLite Developer and a fake RMNOCASE collation, all records
 from the .RMGC database file)
 except for Addresses, Config, FactTypes, GroupNames, Places, Roles,
 Master Sources, Source Templates and associated Media thus creating
 a Master database shell.
 NOTE THE UNCOMMENT INSTRUCTION FOR USE WITH RM5
*/
BEGIN TRANSACTION ;
DELETE FROM AddressLinkTable ;
--DELETE FROM AddressTable ;
DELETE FROM ChildTable ;
DELETE FROM CitationTable ;
--DELETE FROM ConfigTable ;
DELETE FROM EventTable ;
DELETE FROM ExclusionTable ;
--DELETE FROM FactTypeTable ;
DELETE FROM FamilyTable ;
DELETE FROM GroupTable ;
--DELETE FROM LabelTable ;
DELETE FROM LinkTable ;
DELETE FROM MediaLinkTable WHERE OwnerType NOT IN (3,5) ;
DELETE FROM MultimediaTable WHERE MediaID NOT IN (SELECT MediaID FROM MediaLinkTable) ;
DELETE FROM NameTable ;
DELETE FROM PersonTable ;
--DELETE FROM PlaceTable ;
/*
*** For RM5, UNcomment the following DELETE FROM ResearchLinkTable
*** For RM4, keep as comment
*/
--DELETE FROM ResearchLinkTable ;
DELETE FROM ResearchTable ;
--DELETE FROM RoleTable ;
--DELETE FROM SourceTable ;
--DELETE FROM SourceTemplateTable ;
DELETE FROM WitnessTable ;
COMMIT TRANSACTION ;

TMG-RM Convert TMG_ID to Record Number #tmg #rin

Why?

RootsMagic 6.3.3.2+ imports the TMG_ID into the standard RootsMagic Reference No. fact type (REFN). While this fact type can be displayed after the name of the person in main views and reports, it cannot be displayed in the sidebar Index and in some other places. Some users would prefer that it did; the only number that does is the Record Number (RIN), which is also the fastest search mechanism in RootsMagic Explorer.

How?

This procedure substitutes the TMG_ID value from REFN for all references to PersonID or RIN, which can optionally be displayed after the name. RIN is the most universal ID used across RootsMagic displays and outputs. However, it is volatile when transferred or imported into other databases, unlike the Reference Number fact or the TMG_ID fact formerly created with imports using 6.3.3.1.

Update History

2014-10-08 revised to support imports using RootsMagic 6.3.3.2; no longer supports earlier versions.
2014-09-24 handles single or small number of changes with proportional time; previous version was only suited to changing all; logs potential conflicts and
warnings in temp table xRIN_TMGIDlog which should be opened if the trial query aborts in order to find and resolve the cause of the error; logs a warning if
multiple TMG_ID facts for same person. Log displayed if script completes without an abort.

N.B. Be sure to close the database from RM before running this procedure

Many tables are changed so the procedure may take quite a while on large databases.While speed optimisation has not been a focus,
a 5000 person database with 15000 events and 11000 citations was operated on for 32 seconds to change 98% of the records, 2 seconds to change a few.
TMG-RM_convertTMG_IDtoRIN.sql

Surplus Reference No. Facts

Now that the TMG_ID is in the RootsMagic RIN, there seems little reason to preserve the Reference Number facts. Fortunately, the import placed TMG Reference tags into a custom RootsMagic fact type “TMG_REF” and added only one Reference No. (REFN) fact to each person to hold the TMG_ID. So a simple SQLite statement can get rid of them all:

DELETE FROM EventTable WHERE EventType = 35 ;

Convert TMG_REF to REFN?

Now that it is no longer necessary to preserve the TMG_ID in REFN or to permit only that REFN for each person for the script to be successful, do we want to keep this custom fact type. Were it exported from TMG to GEDCOM, it would be with the REFN tag. There is probably some logic that it should go to that tag from RootsMagic as well. Moreover, some users may want to optionally display the Reference value after the person Name. Both of those functions are supported if the TMG_REF type facts are converted to REFN facts. A simple SQLite statement can do so:

UPDATE EventTable
SET EventType = 35
WHERE EventType =
(
  SELECT FactTypeID
  FROM FactTypeTable
  WHERE ABBREV LIKE 'TMG_REF'
)
;

Then you can delete TMG_REF from the Fact Type List.

TMG-RM Fact Sentence Tweaks #tmg #facttypes #roles #events #sharedevent

After importing a TMG project, there is considerable cleanup to be done in the resulting RootsMagic database. There are differences in their respective sentence template languages that cannot translate well or could be translated better (improvement possible in the direct import process). This script addresses some of these outcomes and some unwanted artifacts that could have more to do with the TMG user’s style in customizing sentences in TMG. There are very likely more common problems that could be ameliorated by extensions to the script; post suggestions as comments on this page.

There are limits to what can be done within SQLite because it lacks regular expression search and replace within a field. A higher level language using a SQLite connection is required to go beyond SQLite’s own limitations. This script does use the REGEXP extension to find records having a field value that matches a regular expression but the REPLACE() function does not support regex for its search and replace, not even a wild card character; only explicit strings can be used as parameters.

The script processes all sentences associated with facts/events in RootsMagic:

  • the default fact type sentence for the principal;
  • the custom override sentence for the principal(s) for each fact/event;
  • the default role sentence for each sharer role of a shared fact type;
  • the custom override sentence for each sharer (witness) of a fact/event.

The functions performed include:

  • adds [PlaceDetails] to sentences having only [Place] (Direct import translated [L] to [Place])
  • adds :plain modifier to [Date], [Place], [PlaceDetails] if preceded by a common preposition to correct, e.g., “of in”; RootsMagic prepends a default preposition if the :plain modifier is not present.
  • reverses order in switch “<was|and [Spouse] were>” which RM expands to “was” regardless; this first part is considered true in the absence of a variable in it.
  • deletes “[L=English]” (revise the script to cover other unsuppressed language statements).
  • relaces “<|” with “< ” (RM would always output nothing; the first part is true in the absence of a variable)
  • juggles some instances of space characters surrounding switches to correct spacing. This covers some patterns; there are others it does not.

TMG-RM_Sentence_Tweaks.sql N.B. Requires a SQLite manager such as SQLiteSpy that supports the REGEXP extension; SQLite Expert Personal does not.

The script is not restricted solely to be used on databases imported from TMG. It may help with other databases, too. The caveat is that it, too, may have some unwanted results so it is important to keep the original and compare it to the tweaked one to conclude whether the benefits outweigh the collateral damage.

Events – Move Short Note to Description #events #tmg #notes

Do you have a lot of empty Description fields for facts or events that you would like to fill with short contents from the corresponding Note field? This might be the case for certain fact types after an import from TMG, directly or via GEDCOM. Or maybe you have chosen to enable the Description field for a fact type after adding many with sentence-useful content in the Notes. This script may help you with that chore.

The query moves content from Event Note to empty but enabled Event Description if the note is 100 chars or less for all such events of a selected Fact Type. To select a Fact Type, you must use a SQLite manager that supports SQLite run-time variables, such as SQLite Expert Personal (SQLiteSpy does not). When the query is run, a box will pop out prompting for the entry of the Fact Type’s abbreviation. This is the label as seen in the Edit Person screen. By entering the wildcard character (%), all Fact Types having the Description enabled will be processed.

EventNoteToDescription-Move.sql

Some TMG users exploit its split-Memo capability in which the text is sub-divided by the “||” separator. It may be that a variant of this query would move only the first part (M1) to the Description field provided it is 100 characters or less.

Conversely, given that imported Descriptions may contain the separator, a query that would move everything after it from Description to Note might be useful.

Comments?

Discussions & comments from Wikispaces site


robertjm

moving only part, based upon separator, would be awesome!

robertjm
25 December 2015 21:07:42

I’d love to be able to move only a part of the Note to different fields. When I first used TMG I made copious use of the Note field, with separators. Now, I’m finding I want to move stuff around. But, I want to be particular of what I move, and where. Having a rudimentary understanding of Sqllite, I’m not able to “role my own” right now.


ve3meo

ve3meo
25 December 2015 21:18:34

To be able to programmatically extract something from the Note field requires that it be delineated systematically.

Notes Invisible Revealed #notes #tmg #gedcom

GEDCOM files imported from The Master Genealogist and probably other sources may exhibit disappearance of citations and notes for tags in the TMG Name Group. Citations and memos for tags from the Name group that export to the GEDCOM NAME tag will disappear from those that are the first or only NAME tag imported by RootsMagic. They are in the database – just in places you cannot get at through the current user interface. The loss of citations from GEDCOMs of other origins was addressed with SQLite queries in Citations Invisible Revealed. This page provides queries to address the Notes issue.

Notes, Invisible – List.sql Lists the persons and their invisible notes.

Notes, Invisible – Convert to General.sql Appends the invisible note from the primary name to the general note for the person and deletes the first.

Ancestry.com Sync #ancestrycom #gedcom #ftm2014

Under development

This page attempts to find the best practices for working between RootsMagic and Ancestry.com with highest completeness, fidelity and efficiency. It supersedes an earlier page, Ancestry.com and RootsMagic 5, as a result of new understanding of the roles of certain custom GEDCOM tags and a change in what is exported by Ancestry.com.

Summary

Upload RootsMagic GEDCOM to Ancestry.com

  • For previously downloaded Ancestry source references to be recognised by Ancestry, convert the values stored in notes to custom “_APID” tags.
  • Be aware of the RootsMagic database fields not exported or its GEDCOM tags ignored by Ancestry.com

Download Ancestry.com GEDCOM to RootsMagic

  • For ShareMerge to operate on persons previously uploaded, find all “1 UID” and replace with “1 _UID”
  • For Ancestry source references to be preserved, find all custom “_APID” tags and convert to notes.
  • Be aware of the Ancestry Family Tree field values that are not exported

Ancestry.com GEDCOM export/import shortcomings

The GEDCOM exported from Ancestry.com (actually ancestry.ca in my case) is incomplete. Nor does its import include all the values exported. Uploading the GEDCOM to a new Ancestry Member Tree and comparing it to the original tree is a quick way of finding the deficiencies in the export-import round trip. The following have been found to be missing in the imported tree; those asterisked are exported but not imported:

Overview

  • Web Links

Media Gallery

  • Media* (link to a page for each uploaded item is exported but import does nothing with it)

Source

For a user defined source:

  • Publisher Location
  • Publisher Date

Repository

For a user defined repository:

  • Address*
  • Phone Number*
  • Email*
  • Call Number*
  • Notes*

Source Citation

For a user defined source:

Citation Information

  • Web Address moved into “Other information”*

ShareMerge Persons using RM’s UniqueID

There is a way to transport RootsMagic’s internal UniqueID for a person uploaded to an Ancestry Family Tree and have it returned to a RootsMagic database without jumping through the hoops with the custom RMID event I described in the RootsMagic Forums in this post. Ancestry imports the value of the _UID tag exported by RootsMagic, stores it invisibly, and exports it with a UID tag. RootsMagic does not recognise the UID tag but does if it is prepended with the underscore, the same as it exports. The value is imported into the UniqueID for that newly created person in a RM database. If there are two persons in a database with the same UniqueID, ShareMerge merges them.
It is a simple text editor search and replace to find all “1 UID” and replace with “1 _UID” in the GEDCOM exported from Ancestry but it is a bit of a nuisance. Persons in the AFT that did not originate from the RM export but were created within Ancestry are NOT accompanied by a UID tag.
It would be desirable that either Ancestry exported the UID value with the same tag that it saw on import OR that RootsMagic would recognise the UID tag as equivalent to its _UID tag.

Syncing Ancestry Sources via the Ancestry _APID Tag

TBD

Manually Adding _APID Tags for Ancestry Sources

The following is adapted from a post in the ReunionTalk Forum

On manually citing a source from Ancestry, add the Ancestry APID tag to the Source Details Comments, in the same format as the process that converts such tags in an Ancestry GEDCOM to a Comment.

An advantage in doing this is that you can do all your research using RootsMagic, adding a _APID tag detail against each source citation; export the GEDCOM; run a regular expression search and replace to adjust the GEDCOM file and when importing into Ancestry.com, the source citations are all linked to the original Ancestry source records. A disadvantage is it takes alot more effort and validating that the APID details are correct.

The format is _APID 1,<ID>::<Header #> where <ID> is a unique value for each Ancestry source record type and <Header #> is the header which can be extracted from the URL.

The APID tags are found in the GEDCOM file for Ancestry sources that have been saved in your tree. In Ancestry, click on Manage Tree and there is an Export Tree button to click (it takes a few seconds to generate and then you have an option to download the file). This saves a GEDCOM file (text file) which when opened contains the APID tags for each citation (i.e. search for _APID).

Ancestry to my knowledge use these tags internally in their web site and FTM software but the GEDCOM file you export, will show these (provided you have saved Ancestry sources).

For example, a residence event would look like this (some date and some address and source# would be specific to your research entry. The APID details would be specific to the Ancestry record for this research.

1 RESI
2 DATE Some date
2 PLAC Some address
2 SOUR @Source#@
3 PAGE Some date
3 _APID 1,1836::21884408

The format is 1, followed by a APID database tag (sounds complicated but each record collection in Ancestry has a separate tag ID number followed by 2 colons, followed by the header tag for your record. When you look at the URL for each Ancestry record, there is a long text but it has a h=, the number that follows is the header.

This information is keyed into RootsMagic. Once you know the Ancestry tag for one type of records, e.g. UK census 1911, you can use this for all 1911 census citation details with only the header part changing for each. The example above is the tag ID for NZ electoral roll information.

In the above example, the citation Comment you would enter in RootsMagic would be “{_APID 1,1836::21884413}”, sans quotes.