Sources – Copy Repository Name, Address from Repository List #sources #sourcetemplates #repositories


Why?

This page is in response to the request from RootsMagic Forums member
JoopvB: Repositories from TMG. He
asked:
Anybody an idea how to kind of copy the Repository (Info) from the
address table to wherever it needs to be to be used in the source
sentence? I guess I would need to create the custom fields in the source
sentences? But some automated kind of copy for more than 3000 sources
(yeah, I am a splitter 🙂 would be super.

But his problem speaks to a larger issue: some 134 built-in source
templates have a Repository field but there is no mechanism to fill it in
sources from the sources’ Repository data
.

Wish & Workaround

A desirable enhancement to Source Template Language would be the addition of
fields that pull data from the primary Repository for a source. This may
have to function as default data unless overridden by the entry of a “local”
value in the field. Unless and until such an enhancement is developed, the
following scripts can help by batch populating certain empty fields with
data from the Repository List. They may be especially useful to those
migrating from TMG which does have such fields, [REPOSITORY] and [REPOSITORY
ADDRESS]; RootsMagic 7 direct import treats them as a simple variable and
imports them empty without looking up values in the TMG Master Repository
List.
The first script changes the names of Repository variables to match those of
the RootsMagic built-in templates. The second script populates empty
Repository-type fields in Sources from values in the RootsMagic Repository
List.

Two Steps

Harmonize Field Names


Source Template Field Names for Repository Information
Origin of Source TemplateNameLocationReference
RootsMagic[Repository][RepositoryLoc]
JoopvB TMG import [Repository][RepositoryInfo][RepositoryReference]
TMG Sample Project import[Repository][RepositoryAddress][RepositoryReference]

With other customizations either in the originating software or in a
RootsMagic database, there could be a variety of other aliases that mean the
same thing. Even with the built-in templates, there are some exceptions: two
instances of [RepositoryCity] with [RepositorySt]; these are unhandled.
The :Abbrev modifier is also used in two instances with [RepositoryLoc] and
will necessarily be ignored unless the user types in the “||” separator in
the State field followed by the abbreviation for the location.
So it would seem desirable to make the custom ones consistent with the most
common ones found in the built-in templates so that the script that does
copying from the Repository List to the Source need only deal with one set
of names and can do so for sources based on both built-in and custom source
templates. This next script changes the templates and master sources to use
[RepositoryLoc] instead of [RepositoryAddress] and [RepositoryInfo]. It can
be readily extended to harmonize other aliases.
Sources-UnifyAliases_RepositoryLoc.sql

Copy
Values from Repositories to Sources

The following script copies Repository data to the Sources based on this
mapping:
Repository Name (AddressTable.Name) ==> [Repository]
Repository City and State (AddressTable.City, AddressTable.State) ==>
[RepositoryLoc]
Call Number (AddressLinkTable.Details) ==> [RepositoryReference]
It currently copies only to those fields that are empty, as would be the
case for a direct import from TMG. Another version could copy regardless but
that would also “reset” all “local” values to “default” which may be
undesirable.
Sources-CopyRepositoryInfoTo.sql

SubjectAuthorRepliesViewsLast Message
What
fields from AddressTable?
ve3meo ve3meo12141Dec
16, 2014
by JoopvB JoopvB
Custom
source templates, not Free Form?
ve3meo ve3meo168Dec
11, 2014
by JoopvB JoopvB

Discussions & comments from Wikispaces site


ve3meo

Custom
source templates, not Free Form?

ve3meo
11
December 2014 17:19:46

Are these sources all using custom source templates?


JoopvB

JoopvB
11
December 2014 22:02:39

Yes, all are custom templates in TMG.
Joop


ve3meo

What
fields from AddressTable?

ve3meo
11
December 2014 17:26:50

What fields do you want from the AddressTable?
Can they be concatenated into a single field in the
SourceTemplate? Think about what you want to see in the three
sentences: Footnote, Short Footnote, Bibliography. If all are
to be the same or if only one of them is to have the Repo
info, then they can be concatenated into one field. But if you
want a subset of the needed fields in another sentence, then
there must be more than one template field. Of course, there
could be template fields corresponding to the needed
AddressTable fields which might be desirable for future data
entry and greatest flexibility at the expense of complexity.


ve3meo

ve3meo
11
December 2014 19:24:47

The TMG Sample project imported to RootsMagic has custom
source templates whose name begins with “_TMG_”. These
typically have two fields named and displayed as:
Repository and RepositoryAddress
There is another field named RepositoryReference which I
presume would be specific to the source and therefore no
value for it should be expected to be in the AddressTable.
There are many standard RM source templates with the two
fields:
[Repository] = “Repository Name”
[RepositoryLoc] = “Repository Location”
So I think the AddressTable fields for the Repository info
should be mapped to these two fields:
AddressTable.Name ==> [Repository]
AddressTable.(City, State) ==> [RepositoryAddress] (or
RepositoryLoc)
That should be sufficient to identify the Repository
uniquely in the footnote and/or bibliography and to
facilitate its lookup in a Repository List for details. It
is only when publishing that such info is needed in the
footnote or bibliography because online interaction in
RootsMagic provides it outside the sentence.
Tom

Reports – Concordances for Indexes #names #alternatenames #places #reports #msword #index

Marking for Indexing Needed for Individual Summary and Custom Reports

RootsMagic 6 does not generate in reports an Index of Names or an Index of Places for the Individual Summary report, nor for custom reports. Yet one can readily generate a batch of these reports and it would be handy to have them indexed. Even when included in a Reports > Publisher ‘Book’, they are not covered by the auto-generated Indexes process. When the report is saved to RTF, one could manually mark names and places for indexing using Microsoft Word but the effort is laborious and has to be repeated the next time the report is generated.

Automarking from a Concordance Table in Microsoft Word

The good news is that MS Word has an Automark feature to expedite indexing. One simply creates a separate MS Word document containing a two column table. The left column contains the terms to be marked for indexing and the right column contains the value under which it is to be indexed, i.e., the Index entry. This is called a Concordance Table. With the report open in MS Word, you use References > Insert Index > Automark to select the Concordance file and mark for indexing all the matching terms in the document. Then, with cursor located where the Index is to be located, Insert Index again to generate the Index.

Thanks to Charlie Hoffpauir for opening my eyes to this capability in MS Word in a discussion on the RootsMagic-Users-L on publishing a report containing everyone in a database. More on Indexing and Automarking with a concordance table at How-To Geek, including a VB Script for cleaning out the index marks if you have to redo your concordance table for that document.

Problem Creating Concordance Table using RM Custom Reports

Using a RootsMagic custom report, it is possible to create a concordance table but there are issues. The Automark search is case-sensitive; an exact match is required. I like to have surnames in upper case in reports and that is achieved for standard RootsMagic reports by checkmarking the box “Display surnames in upper case” in Tools > File Options > General. However, surnames are not affected by that setting for custom reports (another piece of unfinished business…)! Moreover, to make sub-entries for a surname common to multiple persons, let alone upper case conversion, would require operating on the custom report in a spreadsheet.

Hence, SQLite to the rescue!

A Concordance Table SQLite Query and resulting Index

Names-ConcordanceCapsQuery.png
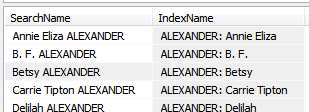
The SQLite query produced this concordance table. Copied from SQLiteSpy straight to a new MS Word document without modification.
Names-ConcordanceCaps.png
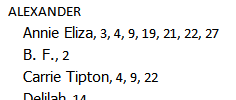
Sample of an Index generated in MS Word by Automarking from a Concordance table generated by a SQLite query.

The Index shows no entry for Betsy ALEXANDER because that search term was not found in any of the reports; Individual Summaries were generated for a subset of the database while the Concordance table has every name, including Alternate Names in it.

A similar query could generate a concordance table of Place Names, albeit a necessarily more complicated one to handle name reversals and Place Details.

Names-ConcordanceCaps.sql Requires a SQLite manager with a RMNOCASE extension.

-- Names-ConcordanceCaps.sql
-- 2014-11-25 Tom Holden ve3meo
/*
Creates a temporary SQLite View laid out as a MS Word
Concordance Table of people's names to aid in the generation
of indexes for a collection of Individual Summary reports.
It is of the form:
SearchName              | IndexName
Annie Eliza ALEXANDER | ALEXANDER: Annie Eliza
B. F. ALEXANDER          | ALEXANDER: B. F.
Betsy ALEXANDER          | ALEXANDER: Betsy
 
The left column contains the case-sensitive search string;
the right column has the value to be outputted in the Index.
In this example, the colon will cause one ALEXANDER surname
to be printed with an indented line for each os the individuals.
 
The search surnames have been uppercased because a display
setting in RootsMagic File Options for the database causes
the standard reports to output upper case surnames; that is
what Word will search. If your reports have lower case surnames,
remove the UPPER() function from the SearchName expression.
 
Likewise, if you do not want the Index to have all-cap surnames,
remove the UPPER() function from the IndexName expression.
*/
DROP VIEW IF EXISTS NameConcordanceCaps
;
CREATE TEMP VIEW NameConcordanceCaps
AS
SELECT DISTINCT
  REPLACE
  (
   TRIM
   (
    Prefix || ' '
    || Given || ' '    || UPPER(Surname) || ' '    || Suffix
    )
    , '  ', ' '
   )
  AS SearchName
  ,
  REPLACE
  (
   TRIM
   (UPPER(CASE Surname WHEN '' THEN 'UNKNOWN' ELSE Surname END) || ': '    || Prefix || ' '    || Given || ' '    || Suffix
    )
    , '  ', ' '
   )
  AS IndexName
FROM NameTable
ORDER BY IndexName
;

A Concordance Table and Index that groups by First Name

This is a more advanced table that relies on the report having the person’s Record Number following their name so that it can include Birth Year and Death Year in the Index. It responds to a wish expressed by RootsMagic Forums member Paul1307 in the topic Sorting in Index that names be sorted by surname, first name, year(s), excluding middle names from the sort.

Names-ConcordanceCapsFirstYrsMids.PNG
Snippet of the index for an 80 page batch of Individual Summary reports, created from the Concordance Table generated from a SQLite query.

This query creates a temporary View in SQLite that does the heavy lifting of parsing Given names into First Name and Middle Names and creates the Era string from the person’s Birth and Death years; it is named “NameGivensParsed”. The second View “NameConcordanceCapsFirstYrsMids” is the Concordance Table. Click on that View to see the resulting table, select all the results, copy and paste into a new blank MS Word document. Save the document to where you can readily find it for use with RM reports from this database.
Names-ConcordanceCapsFirstYrsMids.sql

RootsMagic 7

RootsMagic 7 was released on 25 Nov 2014. It will take some time to answer the following questions:

  1. Which SQLite scripts on this wiki need to be revised? Identifying changes in the database design will trigger areas to investigate.
  2. Which ones can be retired? Requires comparing the functional capabilities of RootsMagic 7 to those of the relevant scripts.
  3. Are there new exploits needed? Depends on user feedback in various forums.

Your help in this process is needed; the size of this wiki is too much to expect one person to handle in a timely fashion.

SQLiteToolsForRootsMagic Blazes Trails

Some of the new features of RootsMagic 7 were conceived and/or pioneered on this wiki. Only the RootsMagician can say what influence it has had on product development. Some examples:

New FeatureWiki PageWiki Date
Compare FilesComparing Two RM Databases2011-12
Import ListsDepopulate but keep Customs, Places, Sources
Database – Copy Master Lists to Shell
2011-12
2014-10
Backup and Restore with MediaBackup Media with Database – RAR
Backup Media with Database – 7Zip
2011-02
2011-03
Quick GroupsNamed Group – Mark or Unmark List refresh2011-11

Okay, a couple of those might be a bit of a stretch…

Database Structure Unchanged from RM6

There have been no changes to the SQLite database structure between RootsMagic 6 and 7. The database version stored in the ConfigTable remains at “6000”. Results (or absence thereof) from the following queries (run individually) support these observations. The main database was an empty one created by RootsMagic 6; the attached one was an empty one created by RootsMagic 7.

SELECT * FROM main.sqlite_master OLD
LEFT JOIN EmptyRM7000.sqlite_master NEW USING(name)
WHERE OLD.SQL NOT LIKE NEW.SQL
ORDER BY name;
 
SELECT * FROM main.sqlite_master OLD
LEFT JOIN main.sqlite_master NEW USING(name)
WHERE OLD.SQL NOT LIKE NEW.SQL
ORDER BY name;
 
SELECT CAST(DataRec AS TEXT) FROM EmptyRM7000.ConfigTable
;

That is not to suggest that one can work on the same database with both versions with impunity. There will have been changes in how fields are used, perhaps the meanings of some values, giving rise to possible problems. However, the RootsMagician says in a private email on 26 Nov: “Yes. You should be able to switch back and forth between 6 and 7.

Discussions & comments from Wikispaces site


chiptobey

Place update query

chiptobey
27 February 2017 00:12:37

Short question:
I need a query to concatenate the place detail to the place.

Long question: I used the data clean and moved things like cemetery name to the place detail. When I went to combine like places, I found this to be the wrong course as I would have to count the record position that had place detail so I would combine places resulting on people being born in the cemetery. Bruce could fix this by displaying the details on the list of locations to be combined but that hasn’t happen yet.

I have 100’s of these places and need to get the detail info back into the place so I can see which ones need to be combined.

Can you email chiptobey1@hotmail.com as well as posting? Thanks!!


ve3meo

ve3meo
27 February 2017 00:24:08

See Places – Conversion of Place Details to Places

Fact Type – Convert Census to yyyy Census and back #facttypes #census

This page and scripts respond to a wish posted by Jerry Bryan to the RootsMagic Forum, quoted in part:

… for U.S. censuses I’m thinking of creating user defined fact types called census1790, census1800, census1810, etc. through census1940. These user defined fact types would be exact clones of the built-in census fact type. For example, there is nothing that would tie the census1790 fact type to the year 1790 except for the name of the fact type. Then I would have a script that changes all census events for the year 1790 to census1790 events for the year 1790 and so forth for each U.S. census year. Nothing would change in any report that would come out of RM.

Why would I do such a strange thing? Because then I could profitably put census events into People View. At the present time, it’s a big waste of time to try to put census events into People View because census events are effectively duplicate events and only one such duplicate can be displayed in People View. With the new scheme, I could put any particular U.S. census year into People View.

And of course, on the back end, I would want to restore each of the census1790, census1800, etc. events back to standard census events.

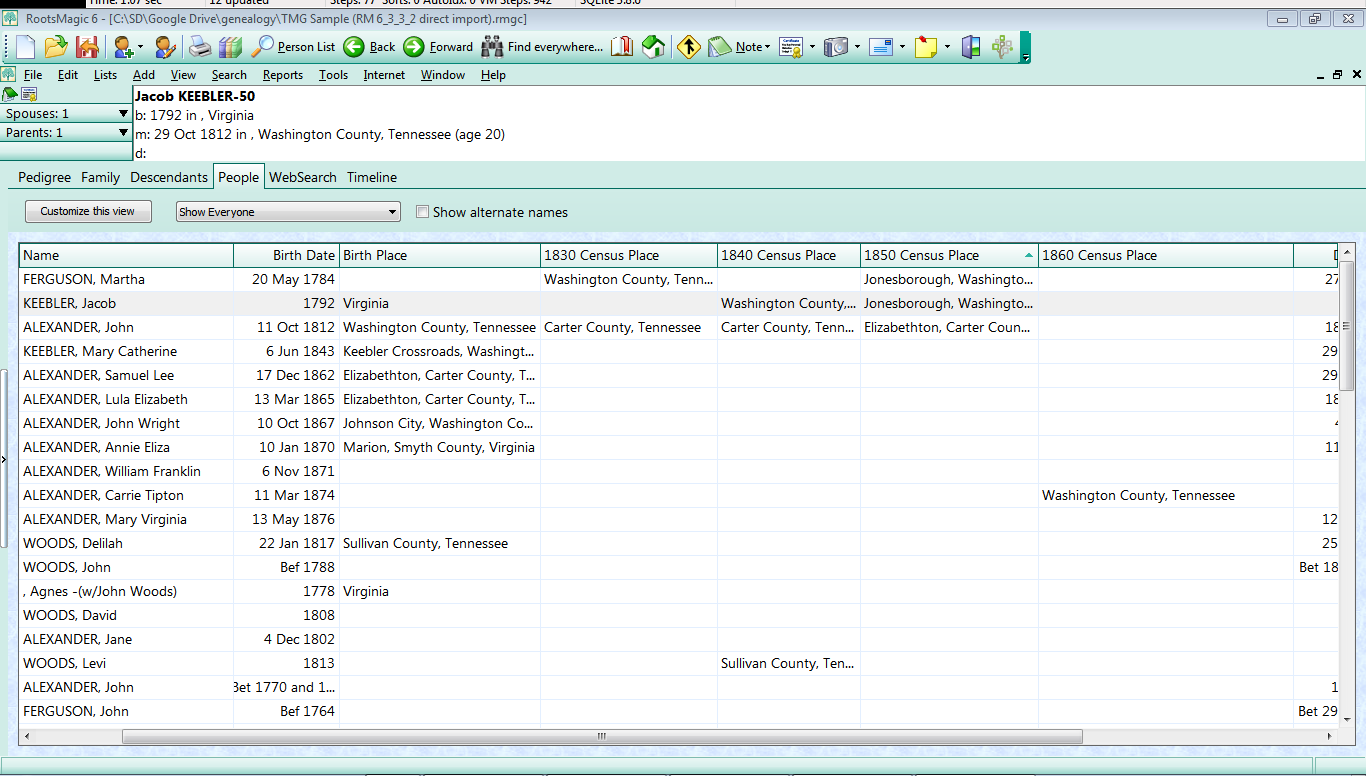
An example of the results from these scripts can be seen in the screenshot:

FactType - Convert Census to Year_Census.PNG
The script created custom fact types from the standard Census and Census (family) fact types by prepending any year found among all the census events in the database. It then switched each event from the standard fact type to the year-specific custom census fact type. Thus, the People View can have one or more of these yyyy-Census events in columns, four chosen for this screenshot. With multiple yyyy Census columns, holes in the census pattern and migration can be easily seen.

Note that People View shows Fact or Event data for only the Principal of an Individual (Personal) fact type; Family type events are not shown nor are events for persons that are ‘sharers’, i.e., having a role other than Principal.

The scripts make no distinction among census jurisdictions; a database with many countries may have the 1901 Census fact type for UK, Canada, etc. I thought of attempting to incorporate the Country in the name of the fact type but this is impractical given the variety of Place name practices among users and the range of jurisdictions.

Requires a SQLite Manager with an extension for a RMNOCASE collation sequence.

Usage:

1. Execute once and once only if you intend this to be a temporary change.

2. To revert said temporary change to the original, one or more tables is stored in the database, named, e.g., “xCensusTypeTranspose”; you then select and execute the script in comments at the end of the script file and the special table(s) is dropped from the database after the events (and roles) have been restored to standard type.

3. If, after step 1, you add more standard events and re-execute, the reversion script can only return to the state prior to the last conversion. Only those yyyy-Census fact types that become unused through reversion will be deleted.*

4. A separate reversion script may be developed to convert all events of fact type name like “yyyy Census%” to standard Census types.

Two versions of scripts were developed. One covers both shared and unshared census events; the other can be used on a database having no shared census events and will take less time, notably on large databases.

FactType – Convert Census_shared to Year_Census.sql Use this script if you have shared Census events.
FactType – Convert Census_unshared to Year_Census.sql Use this script if you have only unshared Census events.

  • If People View has a column for a fact type that has been deleted, the next time you customize that view and exit from it, RootsMagic will appear to stall and, after a wait, throw an error message indicating that an index is out of bounds. To clear that problem, open “Customize this view” and select and Remove the blank row(s) at the bottom of the panel “Columns to display”. OK the customization and the error should be cleared.

Places to Place Details Conversion #places #placedetails #update

Why?

Splitting Places into Place and Place Details is an onerous job in RootsMagic: you have to edit every fact/event that used the original Place. Until RootsMagic comes up with a utility to make it easier to do, we need a better way. With some judicious SQLite queries and editing of RM’s Place List, there is a faster, better way. The opposite direction is much easier.

Split Place into Place and Place Detail

Here’s an example of how SQLite can carry out the bulk conversion of Places having too detailed data to Place Details of another Master Place, e.g.:
Place: Mount Pleasant Cemetery, London, Ont.
to
Place: London, Middlesex Co., Ontario, Canada
Place Detail: Mount Pleasant Cemetery
and accordingly revise the 5, 50, 500 facts/events that used the original Place or any other Place having “London, Ont” in its name.

The example uses a series of SQLite queries run one at a time in sequence, but, first, make sure that you have your desired master Place in your Place List, e.g., “London, Middlesex Co., Ontario, Canada” and MAKE A BACKUP:

-- Pick out the PlaceID of the desired Master Place, i.e., "London, Middlesex Co., Ontario, Canada",
-- from the results of this query
 
SELECT * FROM PlaceTable
WHERE Name LIKE 'London,%';
 
-- This will be the MasterID value for the UPDATE - in this example PlaceID=519
PlacesToPlaceDetails-getmasterPlaceID.PNG
Results from 1st query. Choose PlaceID=519 as the master Place.
-- Establish a suitable WHERE constraint that finds all the Places that need to be converted to Place Detail
-- The following worked well. Note the underscore character is a wildcard for any one character and
-- thus precludes a name beginning "London..." from the results.
-- The percent character is a wild card for any number of characters.
 
SELECT * FROM PlaceTable
WHERE Name LIKE '_%London, Ont%' AND PlaceType=0;
 
-- PlaceType of 0=Place, 2=Place Detail (1=Temple)
PlacesToPlaceDetails-testWHEREforPlacesToConvert.PNG
Results from 2nd query showing the Places to be converted to Place Details.
-- Use that WHERE constraint in the following
-- Convert Places in PlaceTable to Place Details of the Master Place (PlaceID=519 in this example)
 
UPDATE PlaceTable SET PlaceType=2, MasterID=519
WHERE Name LIKE '_%London, Ont%' AND PlaceType=0;

SQLite manager reports 4 records updated.

-- Convert Place and Place Detail cited in the EventTable
 
UPDATE EventTable SET SiteID=PlaceID, PlaceID=519
WHERE PlaceID IN
(
 SELECT PlaceID FROM PlaceTable
 WHERE Name LIKE '_%London, Ont%' AND PlaceType=2
 )
AND SiteID=0;

SQLite manager reports 5 records updated, i.e., five events used at least some of the four Places previously converted to Place Details and now use the master Place and the corresponding converted Place Details.

Now look up the Master Place (London, Ontario, Canada) in the RM4 Place List to confirm that the former Places are now its Place Details.

PlacesToPlaceDetails-RMPlaceListResults.PNG
Place List immediately after SQLite queries. 90 Albert was already a Detail for the master Place.
  1. Optionally merge variants of the same place with the target master Place.
  2. Print > Place List > all events in a single place (our “London, Middlesex…” master), check the box “Print place details”.
  3. Inspect the report for unused Place Details and delete them at your discretion.
  4. You may have variants of the same Place Detail that you want to unify; can be done with further queries but for a few, just go to Edit Person and revise the fact. Reiterate from step 2.
  5. Edit each remaining Place Detail to remove the now redundant Master Place info (i.e.”, London, Ont…”)
PlacesToPlaceDetails-RMPlaceListFinal.PNG
Final Place List after bulk SQLite conversions and RM4 edits.

Editing the Place Detail name in RootsMagic 4 rather than in SQLite is necessary because of the proprietary RMNOCASE collation sequence. It is possible to edit the Place Detail name of a RootsMagic 5 database with SQLiteSpy + the fake RMNOCASE extension and then use RM5’s File > Database tools > Rebuild indexes function to correct probable index errors.

Convert Place + Place Detail to Place

This is a much easier, global procedure but needs a SQLite manager that supports a fake RMNOCASE collation, such as SQLiteSpy with the fake RMNOCASE extension (see RMNOCASE – faking it in SQLiteSpy) or SQLite Expert (see RMNOCASE – faking it in SQLite Expert…).

Place_Details-Convert_to_Place.sql
Download this file and load it into SQLiteSpy, having opened your database with it first. Of course, you’ve made a backup! Run the script. The results should be a series of UPDATE statements. Copy these results into a new SQL page in the SQL editor, delete the first line which has the column heading ‘Statement’ and execute all the statements. Place Details are now Places.

You may think you are finished, but not quite. In RM5, do File > Database > Integrity Check. If you see errors reported, then choose Reindex from the same menu and that should clear them. Unfortunately for RM4 users, there is no equivalent tool so you are at greater risk of some form of index corruption due to the fake collation.

/* Place_Details-Convert_to_Place.sql
Converts Place Details + Places into Places; preserves apostrophes
 through some tricky substitutions but other characters may be problematic.
2012-01-22 ve3meo
 
Three steps:
1. Update EventTable SET PlaceID=SiteID, SiteID=0 WHERE SiteID>0
2. Auto generate a statement for each Place Detail of the form
    Update PlaceTable SET Name = SiteName, PlaceName, PlaceType = 0, MasterID = 0
3. Manually copy the resulting series of Update Statements to a SQLite editor and run them
*/
-- Step 1 Open database and run this script
UPDATE EventTable SET PlaceID=SiteID, SiteID=0 WHERE SiteID>0
;
-- Step 2 auatically generates the UPDATE statements for each Place Detail
SELECT 'UPDATE PlaceTable SET Name = '''
       || REPLACE(Site.Name || ', ' || Place.Name, '''', '''''') || ''''       || ', PlaceType = 0, MasterID = 0
       WHERE PlaceID = ' || Site.PlaceID || ';'
       AS Statement
FROM PlaceTable AS Site INNER JOIN PlaceTable AS Place ON Site.MasterID = Place.PlaceID
;
-- Step 3 Copy the resulting UPDATE statements to your SQLite Editor and run them against the database

Discussions & comments from Wikispaces site


mfseeker

Place details to place names conversion

mfseeker
23 January 2012 02:04:56

I need to opposite conversion. I have a couple of hundred place details in my RM5 tree, and I need to export it to be imported into FTM2012. Family Tree Maker does not recognize the place detail tags (ADDR line following a PLAC line). It just ignore the place detail. Is moving the place detail to the first of five places in the place name trivial or difficult. In either case, can someone help me to do it?


ve3meo

ve3meo
23 January 2012 02:38:20

It should be an easier conversion than the opposite. I’m sure somebody will come up with a solution in a few days. Another export issue is shared facts, not covered by standard GEDCOM.

Question with respect to Changing a Master Source to a Different Source Template #sources #sourcetemplates

I probably should post this more as a question than as a new wiki page, but here goes anyway.

I’m continuing apace with my project to convert all my sources into extremely split sources. As such, I ran into an interesting situation.

I now have several dozen obituaries that have been entered as extremely split sources. All of the extremely split obituary sources are using the built-in Free Form source template. When I need to make a new obituary source, I simply copy an existing obituary source and edit it a bit to reflect the new obituary source.I then memorize and paste the citation for the new obituary source in lots of appropriate places because an obituary typically mentions a fairly large number of people.

I’m very pleased with results. In particular, if I need to change something in an extremely split obituary source then the change is automatically applied to all its citations without having to chase down each of the citations. However, I have found myself wanting to make minor tweaks to each of my several dozen extremely split obituary footnote sentences. This is still a manual operation, and will only get worse as I add more obituary sources to my collection of extremely split sources. So I’m beginning to wish that I had created a source template for my extremely split sources. My source template would store all the data in the Master Source itself and nothing in the Source Details. With this convention in place, I could still make any needed changes just once for the Master Source and all the changes would immediately be applied to all the citations, and GEDCOM export would be compatible with third party software. But more importantly, by using a source template I could make certain minor tweaks just once to the source template, and the tweaks would be applied immediately (I think!) to all the extremely split Master Sources.

That raises two questions:

  1. Is it really true that if I had started out using my own custom source template instead of the built-in Free Form one that tweaks to the template would be applied immediately to all the Master Sources using the source template?
  2. Is there any straightforward way to convert my Free Form Master Sources for obituaries to templated Master Sources and thereby to avoid having to redo all my citations?

Thanks,
Jerry

Added 12/15/2013

I think I’ve managed to figure out a solution that I’m happy with, and as always Tom’s comments were very helpful. I didn’t really explain very well in my initial post but my ambitions are actually much more modest than creating a fully automated solution that will convert the source templates for all my extremely split obituary sources all in one go. I’m willing to convert them manually and one at a time. If I had thousands of them at this time, I might think differently, but I have exactly thirty-two of them to convert and that’s really not so bad to do manually. What I’m not willing to do manually is for each of my thirty-two extremely split obituary sources to create a new Master Source with a different source template because then for each of the thirty-two I would have to go through and do the memorize and paste thing for each of the many, many citations. So my goal is not to have to redo all the citations, which is really the issue which got me into extreme splitting of sources in the first place. So here’s the process.

  1. Get the new source template as “just right” as possible. I’m not so worried about the exact format of the footnote, short footnote, and bibliography sentences as I am being sure that the template collects the correct data elements. The sentence structure can be easily tweaked. The data elements are not so easy to tweak. This will be my first user defined source template, so it will have TemplateID = 10000. But whatever the TemplateID of my new template is, make note of it.
  2. From within RM, go to the existing source and make a temporary copy of the existing footnote, short footnote, and bibliography sentences – for example, in Notepad. I don’t even need to save the temporary copy in a file, just in the Notepad window. The reason for making the copy is that step #4 is going to have the effect of destroying the existing footnote, short footnote, and bibliography sentences.
  3. Make note of the SourceID for the Master Source for which I’m about the change the template. This is actually much easier than doing a WHERE clause based on the name of the Master Source or anything like that.
  4. Execute the following SQL: UPDATE SourceTable SET TemplateID = 10000 WHERE SourceID = 1403; (or whatever – the 10000 is the TemplateID from step #1 and the 1403 is the SourceID from step #3).
  5. From within RM, edit the Master Source in question. Copy and paste the appropriate data elements I have saved in the Notepad window into the appropriate places in the Master Source. This is really easy to do manually, but would be hard to program in a fully automated fashion.
  6. Repeat steps #2 through #5 for each of the extremely split obituary sources.
  7. Celebrate. No citations are impacted by this process, so I’m done.

Jerry


Some relevant pages:
Source Template, A BETTER Free Form
Sources – Adventures in Extreme Splitting

Discussions & comments from Wikispaces site


ve3meo

Inline comment: “‍Is it really true that if I had started out using my own custom source template instead of the built-in Free Form one that tweaks to the template would be applied immediately to all the Master Sources using the source template? ‍”

ve3meo
04 September 2018 01:40:30

ve3meo Dec 14, 2013

Yes, but do not change the names of any fields that have been used by a source because those values will disappear.


ve3meo

Inline comment: “‍Is there any straightforward way to convert my Free Form Master Sources for obituaries to templated Master Sources and thereby to avoid having to redo all my citations? ‍”

ve3meo
04 September 2018 01:41:53

ve3meo Dec 14, 2013

From Free Form to !MyFreeForm3 is fairly easy as is conversion from lumped to ultimately split. But what you want probably requires high level programming, ideally with an XML interpreter and a regular pattern in your current sources. Give some examples.
ve3meo Dec 14, 2013

I had a second thought this morning and it is reinforced by you saying you did not want an automated solution. It’s along the lines of your procedure but with a major difference – no need to copy the footnote sentences to Notepad because it’s all done within RM. Basically it’s the same principle I used for conversion to !MyFreeForm3 but with an added switch. The new Footnote template contains the [Footnote] field in a switch that outputs it if non-empty; when [Footnote] is empty, it outputs all the other new fields and their bridging phrases and punctuation. A complementary approach would output the latter when any of the new fields is non-empty, rather than depending on the [Footnote] field, which would probably be better, allowing the original footnote sentence to remain intact in its field to be compared against the evolving new footnote sentence as the new fields are filled.
ve3meo Dec 14, 2013

Similarly, you would construct in the new template a switch around the [ShortFootnote] field in the Short Footnote sentence template; the Bibliography sentences template would have a switch around [Bibliography]. I assume you do not use [Page] at all, but, if you do, then it must be in the same part of the switch as [Footnote] or [ShortFootnote].
ve3meo Dec 14, 2013

Using the template Obituary/Newspaper item converted to ultimate split, I added the fields {Footnote], [ShortFootnote], [Bibliography] and [Page], the latter as a Source Detail as that’s what it is in Free Form. I revised the sentence templates to:
Footnote: <[ItemID], <i>[Newspaper]</i>< /[[TranslatedName]/]>, [PubPlace], [Date]<, [Details]><. [Annotation]>.|[Footnote], [Page].>
Short Footnote: <<i>[Newspaper]</i>, [Date].|[ShortFootnote], [Page].>
Bibliography: <<i>[Newspaper].</i> [PubPlace], [Date].|[Bibliography].>
i.e., just the original sentence template in each case with the addition of a switch to output the original Free Form fields. That would be your step #1,
I skip to your step #4 and then iterate #5 for each master source working entirely within the Edit Source window, copying elements from the original Footnote sentence into the appropriate fields until the new sentence looks right. At all times the original FF values are always available to compare against the developing sentences.

There could be another step – conversion of Free Form sources to Ultimate Split with a corresponding change in the new template, or that conversion could be done after the FF-to-template conversion
thejerrybryan Dec 14, 2013

The approach of adding [Footnote], [ShortFootnote], [Bibliography] and [Page] to the source template looks really promising to avoid all the nonsense with Notebad. I’ll give it a try before proceeding further. It may be tomorrow night before I get a chance to look at it. My newest grandson (three months old) is “helping” me decorate my Christmas tree tonight.
ve3meo Dec 14, 2013

Wonderful! I may be doing the same thing with my first grand child at 9 mos, next Christmas.
ve3meo Dec 14, 2013

Stimulated by this discussion, I have just conceived a solution to my wish for the ability to use templates to help in the drafting of Free Form sources and the same solution can be used in the opposite direction. It is based on having both the set of template fields and the set of Free Form-like fields in the template as above but with the addition of a non-printing field [ForceFF] acting as a control over which set is output. The revised sentence templates for this example are:
Footnote: <? [ForceFF]|[Footnote], [Page].|<[ItemID], <i>[Newspaper]</i>< /[[TranslatedName]/]>, [PubPlace], [Date]<, [Details]><. [Annotation]>.|[Footnote], [Page].>>

Short Footnote: <? [ForceFF]|[ShortFootnote], [Page].|<<i>[Newspaper]</i>, [Date].|[ShortFootnote], [Page].>>

Bibliography: <? [ForceFF]|[Bibliography].|<<i>[Newspaper].</i> [PubPlace], [Date].|[Bibliography].>>

If the ForceFF field is empty, then the sentences come from the template fields, if none are empty, else from the FF-like fields. If the ForceFF field has a value in it, the sentences come from the FF-like fields.
thejerrybryan Dec 14, 2013

I’m basically now to the point of following Tom’s suggested model, and I’m having great success. I added [Footnote], [ShortFootnote], and [Bibliography] to my obituary source template, and converted all my extremely split obituary sources to use the new template. The data is all there. Tom is correct that I don’t use [Page], but I don’t know how I would get at it anyway since I’m only dealing with the SourceTable and [Page] is in the CitationTable. In any case, with this approach my existing footnote, short footnote, and bibliography sentences show up just fine and the nonsense with Notepad is not required.

And like Tom, I’ve come to realize the great value of having data elements that are collected on the “input” side of the source template but which might never appear on the “output” side of of the source template (which is to say, in any of the footnote, short footnote, or bibliography sentences). For example (and as Tom says), such data may be able to serve as switches. Or right now while I’m fine tuning my obituary source template, I can quickly switch back and forth between an output sentence consisting just of one data element such as [Footnote] on the one hand, or else consisting of multiple data elements such as [DeceasedName], [Newspaper], [NewspaperDate] etc. on the other hand.

There are many problems with RM’s implementation of source templates, and one key problem is just that there are so many of them and users can’t figure out which one to use. For example, some of the simplest source templates surely have to be the ones for books, but why do there have to be seven different such templates and how is a user to figure out which one of the seven to use? I think they could all be combined into one. For example, one issue is that in the bibliography sentence the author must be listed last name first for proper alphabetic order, except for when the author is something like the Podunk County Genealogical Society. So there are two separate source templates for these two cases. It seems much better to me to have only one source template and to differentiate these cases with switches.
ve3meo Dec 14, 2013

I ran with the combining of Free Form into templates and developed a batch query on the page Source Templates – Versatile Free Form Hybrids. One potential problem with the idea of combining variants of a template into one is that the Edit Source window precludes access to the bottom of the list if there are more than a certain number of fields.

Inline comments


ve3meo

Comment: Yes, but do not change the names of a…

ve3meo
15 December 2013 03:22:51

Yes, but do not change the names of any fields that have been used by a source because those values will disappear.


ve3meo

Comment: From Free Form to !MyFreeForm3 is fai…

ve3meo
15 December 2013 03:22:51

From Free Form to !MyFreeForm3 is fairly easy as is conversion from lumped to ultimately split. But what you want probably requires high level programming, ideally with an XML interpreter and a regular pattern in your current sources. Give some examples.


ve3meo

ve3meo
15 December 2013 16:55:07

I had a second thought this morning and it is reinforced by you saying you did not want an automated solution. It’s along the lines of your procedure but with a major difference – no need to copy the footnote sentences to Notepad because it’s all done within RM. Basically it’s the same principle I used for conversion to !MyFreeForm3 but with an added switch. The new Footnote template contains the [Footnote] field in a switch that outputs it if non-empty; when [Footnote] is empty, it outputs all the other new fields and their bridging phrases and punctuation. A complementary approach would output the latter when any of the new fields is non-empty, rather than depending on the [Footnote] field, which would probably be better, allowing the original footnote sentence to remain intact in its field to be compared against the evolving new footnote sentence as the new fields are filled.


ve3meo

ve3meo
15 December 2013 17:17:11

Similarly, you would construct in the new template a switch around the [ShortFootnote] field in the Short Footnote sentence template; the Bibliography sentences template would have a switch around [Bibliography]. I assume you do not use [Page] at all, but, if you do, then it must be in the same part of the switch as [Footnote] or [ShortFootnote].


ve3meo

ve3meo
15 December 2013 22:05:38

Using the template Obituary/Newspaper item converted to ultimate split, I added the fields {Footnote], [ShortFootnote], [Bibliography] and [Page], the latter as a Source Detail as that’s what it is in Free Form. I revised the sentence templates to:
Footnote: <[ItemID], <i>[Newspaper]</i>< /[[TranslatedName]/]>, [PubPlace], [Date]<, [Details]><. [Annotation]>.|[Footnote], [Page].>
Short Footnote: <<i>[Newspaper]</i>, [Date].|[ShortFootnote], [Page].>
Bibliography: <<i>[Newspaper].</i> [PubPlace], [Date].|[Bibliography].>
i.e., just the original sentence template in each case with the addition of a switch to output the original Free Form fields. That would be your step #1,
I skip to your step #4 and then iterate #5 for each master source working entirely within the Edit Source window, copying elements from the original Footnote sentence into the appropriate fields until the new sentence looks right. At all times the original FF values are always available to compare against the developing sentences.

There could be another step – conversion of Free Form sources to Ultimate Split with a corresponding change in the new template, or that conversion could be done after the FF-to-template conversion


thejerrybryan

thejerrybryan
15 December 2013 22:37:37

The approach of adding [Footnote], [ShortFootnote], [Bibliography] and [Page] to the source template looks really promising to avoid all the nonsense with Notebad. I’ll give it a try before proceeding further. It may be tomorrow night before I get a chance to look at it. My newest grandson (three months old) is “helping” me decorate my Christmas tree tonight.


ve3meo

ve3meo
16 December 2013 04:09:56

Wonderful! I may be doing the same thing with my first grand child at 9 mos, next Christmas.


ve3meo

ve3meo
16 December 2013 15:14:53

Stimulated by this discussion, I have just conceived a solution to my wish for the ability to use templates to help in the drafting of Free Form sources and the same solution can be used in the opposite direction. It is based on having both the set of template fields and the set of Free Form-like fields in the template as above but with the addition of a non-printing field [ForceFF] acting as a control over which set is output. The revised sentence templates for this example are:
Footnote: <? [ForceFF]|[Footnote], [Page].|<[ItemID], <i>[Newspaper]</i>< /[[TranslatedName]/]>, [PubPlace], [Date]<, [Details]><. [Annotation]>.|[Footnote], [Page].>>

Short Footnote: <? [ForceFF]|[ShortFootnote], [Page].|<<i>[Newspaper]</i>, [Date].|[ShortFootnote], [Page].>>

Bibliography: <? [ForceFF]|[Bibliography].|<<i>[Newspaper].</i> [PubPlace], [Date].|[Bibliography].>>

If the ForceFF field is empty, then the sentences come from the template fields, if none are empty, else from the FF-like fields. If the ForceFF field has a value in it, the sentences come from the FF-like fields.


thejerrybryan

thejerrybryan
16 December 2013 16:12:41

I’m basically now to the point of following Tom’s suggested model, and I’m having great success. I added [Footnote], [ShortFootnote], and [Bibliography] to my obituary source template, and converted all my extremely split obituary sources to use the new template. The data is all there. Tom is correct that I don’t use [Page], but I don’t know how I would get at it anyway since I’m only dealing with the SourceTable and [Page] is in the CitationTable. In any case, with this approach my existing footnote, short footnote, and bibliography sentences show up just fine and the nonsense with Notepad is not required.

And like Tom, I’ve come to realize the great value of having data elements that are collected on the “input” side of the source template but which might never appear on the “output” side of of the source template (which is to say, in any of the footnote, short footnote, or bibliography sentences). For example (and as Tom says), such data may be able to serve as switches. Or right now while I’m fine tuning my obituary source template, I can quickly switch back and forth between an output sentence consisting just of one data element such as [Footnote] on the one hand, or else consisting of multiple data elements such as [DeceasedName], [Newspaper], [NewspaperDate] etc. on the other hand.

There are many problems with RM’s implementation of source templates, and one key problem is just that there are so many of them and users can’t figure out which one to use. For example, some of the simplest source templates surely have to be the ones for books, but why do there have to be seven different such templates and how is a user to figure out which one of the seven to use? I think they could all be combined into one. For example, one issue is that in the bibliography sentence the author must be listed last name first for proper alphabetic order, except for when the author is something like the Podunk County Genealogical Society. So there are two separate source templates for these two cases. It seems much better to me to have only one source template and to differentiate these cases with switches.


ve3meo

ve3meo
17 December 2013 19:09:36

I ran with the combining of Free Form into templates and developed a batch query on the page Source Templates – Versatile Free Form Hybrids. One potential problem with the idea of combining variants of a template into one is that the Edit Source window precludes access to the bottom of the list if there are more than a certain number of fields.

Names – Move Prefix to empty Suffix #names

This little query responds to the desire expressed by RootsMagic Forums member Ksquared to relocate Titles of Nobility from Prefix to Suffix. This is where they ended up in the direct import of his TMG project to RootsMagic. It moves the prefix for each name to the suffix field, provided it is empty. If the suffix field is non-empty, the prefix is left in situ.

The query require a SQLite manager having the RMNOCASE collation, such as SQLiteSpy or SQLite Expert Personal. See SQLite Managers for download links.

Having opened the RootsMagic database with the SQLite manager, copy the statement below into the SQL editor and execute it.

After executing, use the RootsMagic menu File > Database Tools to check database integrity, if not OK then Rebuild Indexes and repeat.

UPDATE NameTable
SET Suffix = Prefix
    , Prefix = ''
WHERE
Prefix NOT LIKE ''  -- only those records with both non-empty Prefix
AND NameID          -- AND empty suffix
NOT IN
(
  SELECT NameID     -- records having a non-empty suffix
  FROM NameTable
  WHERE
  Suffix NOT LIKE ''
)
;

Names – Edit NameTable with SQLite Expert #names #alternatenames #editable #sqliteexpert

A question by MaryLou1955 about swapping a Name with an Alternate Name prompted this look at an easy way to do it, especially for someone new to SQLite. This page starts by showing how one can answer MaryLou’s question by directly editing the RootsMagic database with a SQLite manager without needing to know anything about writing SQL statements. Then it introduces a simple SQLite script that can expedite future edits of the NameTable and introduce you to some very basic SQLite commands and expressions.

While I tend to use SQLiteSpy for most things, I find myself turning to SQLite Expert Personal more frequently than before and this is one of them. While its user interface is a bit more daunting to start with, it has features that ultimately make it more suited to this task – editing a subset of columns from a table. If you do not have it already, visit the page SQLite Managers and follow the links to download SQLite Expert Personal and the associated fake RMNOCASE extension.

Editing RootsMagic Database with no knowledge of SQL

  1. Start SQLite Expert
  2. File > Open Database
  3. Browse to the folder holding the copy of your RootsMagic database (file extension .rmgc and, of course, you made a backup or this is a copy you have renamed)
  4. Start typing the name of the RM database file in the File name field – a list should drop down. Select the one you want and click Open.
  5. Right-click on the name of the database that has now appeared in the sidebar and from the drop-down menu select Load Extension. Browse to where you stored unifuzz.dll and select it. OK the default entry point in the pop out window
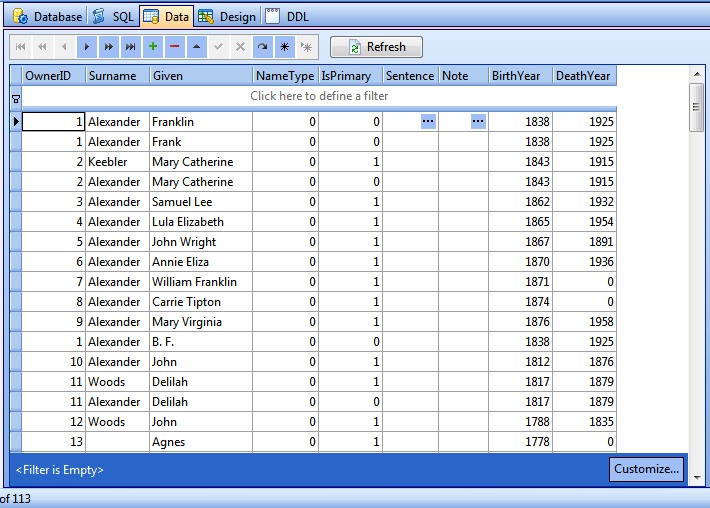
  6. Click on the table name “NameTable” listed in the sidebar under the database name and then on the Data tab. The result should be similar to this: SQLiteExpertNameTable.PNG
  7. You can start editing right now but there are some features you should explore to make it easier and safer:
    1. There are a lot of columns so let’s reduce to the ones we are interested in. Right-click anywhere in the table display and select from the drop-down menu “Select columns”. Uncheck all those that are of no interest and use to your purpose. RecNo is simply the row number of the current result set and has nothing to do with RootsMagic’s Record Number. NameID is not to be touched and is invisible to you in RootsMagic. OwnerID is RootsMagic’s Record Number so check it but do not edit it! After selecting columns, you now have a more compact table to work with as in this screen:SQLiteExpertNameTableSelectColumns.PNG
    2. There’s more: Click on the heading of any column (not on the little funnel icon that will show when the pointer hovers over the header) to sort alternately between ascending and descending on the values in that column.
    3. And really powerful is that little funnel, the filter row below the headings and the filter row at the bot with the Cusize button. These are three complementary controls for filtering the results of any table or query to those of interest. For a simple example, I want to swap the primary Name and an Alternate Name for the person with RootsMagic RIN of 53. I simply type “53” into the filter row under OwnerID and get this:SQLiteExpertNameTableSelectColumnsFilter.PNGNow we see all of the names for Mary Haws-53 altogether and only her names. The NameType numbers represent Birth (2), Married (5) and Nickname (6). The IsPrimary number {1,0} is a True/False indicator. 0 or False means the name is an Alternate Name; 1 or True is the Primary Name. Only one of a person’s names should be marked 1 or Primary; any more disappear from RM screens. Much more complex filtering can be done without knowing any SQLite.
    4. Let’s change the Primary Name from Mary Haws to Polly Haws. There are shortcuts but here is a procedure that works with all types of fields. Right-click on the Mary Haws IsPrimary cell to open the Text Editor on that field. Replace the “1” with “0” and OK. Note the ungraying of the little button with a checkmark in it situated above the results pane. SQLiteExpertEditingControls.PNGThe change you made has yet to be applied to the database file. Clicking on that “Post edit” button completes the edit as does simply selecting a cell in another row. Now we have no Primary Name and RootsMagic has a Person with only Alternate Names. So now we edit Polly Haws’ IsPrimary field from 0 to 1, Post Edit and, voila, RootsMagic now has Polly Haws as the primary name.
    5. As with most Windows programs, there is more than one way to do editing. All the fields of one record can be accessed from an edit screen via the edit record control or by double-clicking on a cell. Experiment with a Play database to get to know the controls and become comfortable with the procedures.
  8. After editing, when you return to RootsMagic, run its Database Tools: Integrity Check, if not OK then: Rebuild Indexes, repeat.

A SQLite script to setup the screen

If you have not written or run a SQLite script before, here is a simple one that will execute the reorganization of the table display into a more compact form sorted by OwnerID (RIN). Names-Edit_NameTable.sql

  1. Download it to a place where you can readily find it.
  2. Click on the SQL tab. Below it, there will appear one or more SQL panes with tabs named SQL1, SQL2, … If this is your first time, there will be one empty pane.
  3. Either via the Main Menu > SQL or by right-clicking in the SQL pane, select “Load SQL script”, browse to and select the .sql file just downloaded. The SQL pane will now show the contents of the script.
  4. To execute the script, be sure that you have the desired database selected in the sidebar, then click the “Execute SQL” button. You will see results similar to this:Names-Edit_NameTableSQLiteExpert.PNG
  5. You can reorganize the results using the same tools as for the Data display and edit the same way. Had the query involved any other table or contained anything other than the raw data from one table, it would be uneditable.
  6. You will note that the order of columns is different from the Data display which, by default, shows the order in the NameTable’s definition. That is a consequence of the order set in the SQLite SELECT statement, which you can change by editing the script and re-executing. You can also change the order in either SQL results or Data displays by dragging the column headers left or right. You can add or delete columns in the script, save it and reuse later.

Where to from here?

I hope this proves to be an easy enough entry into a wider understanding of the RootsMagic database and how it can be viewed and manipulated using a free, but good, SQLite manager. For a powerful search tool and to gain some insight into the roles of the various tables that make up a RootsMagic database, look at Search – wayfinding from data tables to RootsMagic screens.

Database – Copy Master Lists to Shell

A feature oft-requested that, as of version 6.3.3.2, RootsMagic still does not offer while other software does is the ability to create a new database with custom elements from an existing database. This script works around that shortcoming by copying what might be called “Master Lists” from a developed database to a shell database newly created by RootsMagic. It supersedes an earlier script developed for RootsMagic 4 and 5 Depopulate but keep Customs, Places, Sources, published in Dec 2011. (RootsMagic 7 added the feature File>Import Lists from another database which addresses most of what this procedure does. 2019-01-27 TH)

This new script is also a complementary process to the old one. The new one starts with a new database and copies records from the developed database. The old script took a copy of a developed database and deleted people et al from it.

The script copies from a developed RootsMagic database to a new empty database of the same version:

  • customized standard fact types
  • custom fact types
  • master sources
  • media items tagged to sources and places
  • addresses for repositories and contacts
  • custom source templates
  • user defined places
  • webtags for sources and places
  • user settings for File Options rev 2014-10-14

Requirements:
SQLite Expert Personal with unifuzz.dll extension loaded OR equivalent SQLite manager that supports runtime variables and fake RMNOCASE collation. See RMNOCASE – faking in in SQLite Expert, …
Usage:

  1. Create a new empty database using RootsMagic; note the full path; close the database. rev 2014-10-14
  2. Open the developed database in the SQLite manager (it will be known as “main” in the script);
  3. Right-click on the name of the database in the sidebar and select Load extension; load unifuzz.dll;
  4. Load and execute the SQL script in a SQL tab;
  5. Enter the full path to and name of the shell database at the prompt;
  6. On finishing the script, open the shell database with RootsMagic; run Database Tools > Rebuild Indexes. rev 2014-10-14
  7. Close and reopen the database with RM to reset the start person and last person config settings. rev 2014-10-14

Database-CopyMasterListsToShell.sql

Depopulate but keep Customs, Places, Sources #database #places #placedetails #sourcetemplates #sources #facttypes #custom #media #roles

This script deprecated in favour of Database – Copy Master Lists to Shell (2014-10-13).

Makes an empty Master from current database, preserving custom fact types and source templates, Places, Master Sources and associated Repositories and Addresses, and Place/Source Media. Written for RM4 with instructions to edit for RM5.
CustomDatabaseShell.sql
There are two ways to do this:

  1. Use SQLite Developer with a fake RMNOCASE collation and execute the query directly on a .rmgc database. This should pose no risk as it adds nothing to the database. Moreover, RM5 is especially assured because it has the REINDEX Database Tool which will rebuild the indexes against the internal collation.
  2. Use other SQLite managers with the queries on Convert Database to NOCASE to create a NOCASE clone of the database. Then run CustomDatabaseShell query to depopulate the database. This NOCASE clone is usable in RM and probably will not throw up any sorting or indexing issue with the English alphabet, any more so than would the original; however, other language alphabets may be problematic. It would be advisable to add a dummy person, assign every fact, source and place to him, and drag and drop to a new database to restore the structure to RMNOCASE.
-- CustomDatabaseShell.sql
-- 2011-12-09 ve3meo
 
/*
 DELETES all records from a DB3_NOCASE copy of a RM4/5 database
 (OR, with SQLite Developer and a fake RMNOCASE collation, all records
 from the .RMGC database file)
 except for Addresses, Config, FactTypes, GroupNames, Places, Roles,
 Master Sources, Source Templates and associated Media thus creating
 a Master database shell.
 NOTE THE UNCOMMENT INSTRUCTION FOR USE WITH RM5
*/
BEGIN TRANSACTION ;
DELETE FROM AddressLinkTable ;
--DELETE FROM AddressTable ;
DELETE FROM ChildTable ;
DELETE FROM CitationTable ;
--DELETE FROM ConfigTable ;
DELETE FROM EventTable ;
DELETE FROM ExclusionTable ;
--DELETE FROM FactTypeTable ;
DELETE FROM FamilyTable ;
DELETE FROM GroupTable ;
--DELETE FROM LabelTable ;
DELETE FROM LinkTable ;
DELETE FROM MediaLinkTable WHERE OwnerType NOT IN (3,5) ;
DELETE FROM MultimediaTable WHERE MediaID NOT IN (SELECT MediaID FROM MediaLinkTable) ;
DELETE FROM NameTable ;
DELETE FROM PersonTable ;
--DELETE FROM PlaceTable ;
/*
*** For RM5, UNcomment the following DELETE FROM ResearchLinkTable
*** For RM4, keep as comment
*/
--DELETE FROM ResearchLinkTable ;
DELETE FROM ResearchTable ;
--DELETE FROM RoleTable ;
--DELETE FROM SourceTable ;
--DELETE FROM SourceTemplateTable ;
DELETE FROM WitnessTable ;
COMMIT TRANSACTION ;